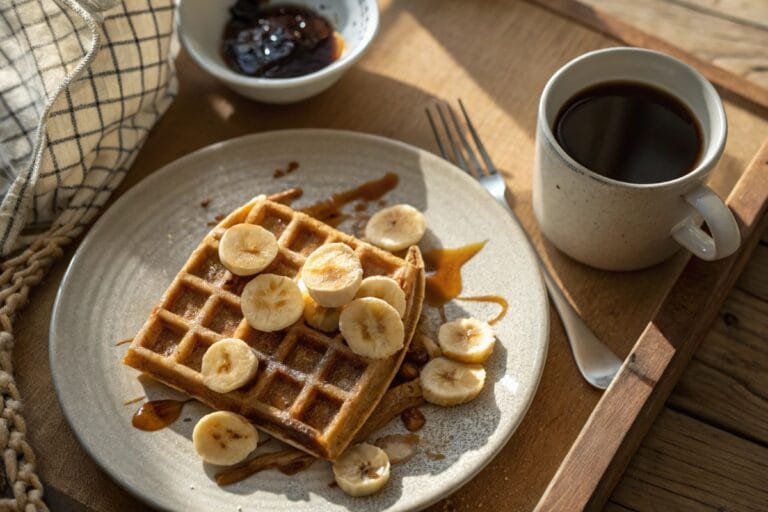
This easy gluten free waffle recipe makes golden waffles with crisp edges and a soft, fluffy center. The batter uses a gluten-free 1-to-1 flour blend, cornstarch, eggs, milk, and melted butter, and it is ready in approximately 25 minutes.
The cornstarch helps the exterior crisp in the waffle iron, while the eggs, milk, and baking powder give the center a lighter texture. Resting the batter briefly also allows the gluten-free flour to absorb the liquid before cooking.
Table of Contents
Serve the waffles immediately with fruit, yogurt, nut butter, or maple syrup, or cool and freeze them for quick breakfasts later. For more everyday meal ideas, visit our gluten-free recipes guide.
Why You’ll Love This Gluten Free Waffle Recipe
The waffles are crisp outside and tender inside.
The batter takes about 10 minutes to prepare.
You do not need to whip egg whites separately.
A gluten-free 1-to-1 flour blend keeps the ingredient list simple.
The complete recipe is ready in approximately 25 minutes.
The waffles can be refrigerated or frozen and reheated.
They work with sweet or savory toppings.
Dairy-free substitutions are included in the recipe notes.
The recipe is suitable for beginner cooks who have a waffle iron.
Are Waffles Gluten Free?
Traditional waffles are generally made with wheat flour and are not gluten free.
Gluten free waffles replace wheat flour with an appropriate gluten-free flour blend. However, using gluten-free flour alone does not guarantee that the complete recipe is suitable for someone who must strictly avoid gluten.
Check the labels of the flour blend, cornstarch, baking powder, vanilla extract, cooking spray, and every topping. Use clean equipment and avoid ingredients that may have been exposed to wheat flour.
This recipe can be prepared as a gluten-free waffle recipe when every ingredient is suitable and cross-contact is prevented during preparation.
Ingredients You’ll Need
Gluten-Free 1-to-1 Flour Blend
Use 210 grams, or approximately 1¾ cups, of a gluten-free 1-to-1 all-purpose flour blend that already contains xanthan gum.
A balanced blend provides more reliable results than using a single flour such as almond, coconut, rice, or oat flour. These individual flours absorb moisture differently and cannot be substituted in the same quantity without changing the recipe.
Check the ingredient list before adding extra xanthan gum. If your blend already contains it, additional xanthan gum can make the waffles gummy.
For the most consistent measurement, use a kitchen scale. If measuring with cups, spoon the flour lightly into the measuring cup and level the top instead of scooping directly from the bag.
Cornstarch
Two tablespoons of cornstarch help reduce the heaviness that can occur in gluten-free waffle batter and contribute to a crisper exterior.
Arrowroot starch may work as an alternative, but the finished texture can be slightly different. Do not replace the cornstarch with additional flour if you want to preserve the intended crispness.
Baking Powder
One tablespoon of baking powder gives the batter lift.
Check that the baking powder is appropriate for your gluten-free needs. Baking powder also varies in sodium content, which can affect the final nutrition values.
Granulated Sugar
Two tablespoons of granulated sugar add mild sweetness and encourage browning.
The waffles are not heavily sweetened, so they can be served with either sweet or savory toppings. If you reduce the sugar, the waffles may brown less evenly.
Eggs
Two large eggs provide structure and help the center remain tender rather than crumbly.
Bring the eggs close to room temperature if possible. Very cold eggs can cause melted butter to firm up when the wet ingredients are mixed.
Milk
Use 1¼ cups of 2% milk for the primary recipe.
The milk hydrates the flour blend and helps create a pourable batter. For a dairy-free variation, use the same amount of unsweetened plant milk, but remember that the flavor, browning, and nutrition values may change.
Melted Butter
One-quarter cup of melted unsalted butter adds richness and helps the waffles crisp.
Let the butter cool slightly before combining it with the eggs and milk. Very hot butter can begin cooking the eggs.
For a dairy-free version, replace the butter with the same quantity of neutral oil or melted plant-based butter suitable for cooking.
Vanilla Extract
One teaspoon of vanilla adds a familiar breakfast flavor without making the waffles excessively sweet.
Confirm that the vanilla extract is suitable when strict gluten avoidance is necessary.
These easy gluten free waffles have crisp golden edges and a soft, fluffy center. The batter uses a gluten-free 1-to-1 flour blend and is ready in approximately 25 minutes.
300 ml (1 1/4 cups) 2% milk, preferably at room temperature
57 g (1/4 cup) unsalted butter, melted and slightly cooled
1 teaspoon vanilla extract
Neutral oil or gluten-free cooking spray for the waffle iron, as needed
Instructions
1. Preheat the waffle iron completely according to the manufacturer’s instructions. Lightly grease the plates if recommended.
2. Whisk the gluten-free flour blend, cornstarch, sugar, baking powder, and salt in a large mixing bowl until evenly combined.
3. In a separate bowl, whisk the eggs. Add the milk, melted butter, and vanilla extract, then whisk until uniform.
4. Pour the wet ingredients into the dry ingredients. Stir just until no dry flour remains, scraping the bottom and sides of the bowl as needed.
5. Let the batter rest for 5 minutes while the waffle iron finishes heating. The batter should be thick but pourable.
6. Stir the rested batter once or twice. Pour the quantity recommended for your waffle iron onto the center of the lower plate, usually about 1/2 to 3/4 cup for a Belgian-style waffle.
7. Close the waffle iron and cook for 4 to 6 minutes, or until the waffle is golden, crisp, and releases easily. Avoid opening the iron during the first few minutes.
8. Transfer the cooked waffle to a wire rack. Repeat with the remaining batter, lightly greasing the plates between waffles if necessary.
9. Serve immediately, or keep the waffles in a single layer in a 200°F oven until ready to serve.
Notes
Use a gluten-free 1-to-1 flour blend that already contains xanthan gum. Do not add extra xanthan gum when it is already listed in the blend.
For the most consistent result, weigh the flour. If using measuring cups, spoon the flour into the cup and level the top.
Different waffle irons require different quantities of batter and cooking times. Follow the appliance instructions and avoid overfilling it.
For dairy-free waffles, replace the milk with the same amount of unsweetened plant milk and replace the butter with 1/4 cup neutral oil or melted plant-based butter.
Cool leftover waffles completely before refrigerating or freezing. Reheat them in a toaster, oven, or air fryer to restore the crisp exterior.
Nutrition is an estimate based on four large waffles and excludes cooking spray, syrup, butter, fruit, and other toppings. Values vary depending on the flour blend and milk used.
Author:Adam Moretti
Prep Time:10 minutes
Cook Time:15 minutes
Category:Breakfast
Method:Waffle Iron
Cuisine:American
Diet:Gluten Free
How to Make Gluten Free Waffles
1. Preheat the Waffle Iron
Preheat the waffle iron according to the manufacturer’s instructions.
Allow it to heat completely before adding the batter. Starting with a properly heated iron helps the exterior set quickly and reduces the chance of pale, soft waffles.
Lightly grease the plates if recommended for your appliance. Even some nonstick waffle irons benefit from a thin coating of oil.
2. Combine the Dry Ingredients
Whisk the gluten-free flour blend, cornstarch, sugar, baking powder, and salt in a large mixing bowl.
Break up any visible lumps and make sure the baking powder is distributed evenly. Unevenly mixed baking powder can create waffles with irregular texture or isolated bitter spots.
3. Mix the Wet Ingredients
In a separate medium bowl, whisk the eggs until evenly combined.
Add the milk, slightly cooled melted butter, and vanilla extract. Whisk until the mixture looks uniform.
If the melted butter begins to form small firm pieces, the milk or eggs were probably too cold. Let the mixture stand briefly at room temperature and whisk it again.
4. Make the Batter
Pour the wet ingredients into the dry ingredients.
Stir just until no pockets of dry flour remain. Scrape the bottom and sides of the bowl with a spatula, but avoid prolonged mixing.
The batter should be thick enough to coat a spoon but still easy to pour. Different gluten-free flour blends absorb liquid at different rates, so the exact consistency can vary slightly.
Let the batter rest for five minutes while the waffle iron finishes heating. This short rest allows the flour and starch to hydrate and can reduce a gritty texture.
5. Cook the Waffles
Stir the rested batter once or twice.
Pour the amount recommended for your waffle iron onto the center of the lower plate. For many Belgian-style waffle irons, this is approximately ½ to ¾ cup, but appliance sizes vary.
Close the iron and cook for four to six minutes, or until the waffle is golden and releases easily. Avoid opening the waffle iron during the first few minutes because the waffle may separate before its structure has set.
Steam usually decreases when the waffle is nearly ready, but color and release are better indicators than steam alone.
6. Keep the Waffles Crisp
Transfer each finished waffle to a wire rack.
Do not stack hot waffles on a plate. Stacking traps steam between them and softens the crisp exterior.
If you are cooking several waffles, keep the finished ones in a 200°F oven on a wire rack set over a baking sheet. Arrange them in a single layer until serving.
How to Make Gluten Free Waffles Crispy
Several small details determine whether gluten free waffles become crisp or remain soft.
Preheat the Waffle Iron Completely
A hot waffle iron begins browning the batter immediately. If the plates are not hot enough, the batter cooks slowly and retains more moisture.
Wait for the appliance’s ready indicator when available. If your waffle iron does not have one, follow the recommended preheating time in its manual.
Include the Cornstarch
Cornstarch lightens the flour blend and helps the surface become crisper.
The two tablespoons in this recipe are enough to improve the exterior without making the center dry or fragile.
Use Enough Fat
Melted butter supports browning, flavor, and crispness. Reducing it significantly can make the waffles drier inside while still failing to produce a crisp surface.
Do Not Open the Iron Too Early
Opening the waffle iron before the exterior has set can tear the waffle. Wait until the initial heavy steaming begins to decrease before checking it.
Place Cooked Waffles on a Wire Rack
A wire rack lets steam escape from the bottom. A flat plate traps that moisture and quickly softens the waffle.
Avoid Stacking
Keep the waffles in a single layer until they are ready to serve. Stack them only at the table, immediately before eating.
What Is the Best Gluten-Free Flour for Waffles?
A gluten-free 1-to-1 or measure-for-measure flour blend containing xanthan gum is the simplest choice for this recipe.
These blends normally combine gluten-free flours and starches designed to behave more like wheat-based all-purpose flour. The exact ingredients differ between brands, which means the batter’s thickness, color, and flavor may also vary.
Do not assume that every gluten-free flour can be substituted equally.
Almond flour contains more fat and does not provide the same starch structure.
Coconut flour absorbs substantially more liquid.
Oat flour produces a softer, more noticeable whole-grain flavor and must be appropriately labeled gluten free.
Rice flour used alone can produce a gritty or brittle waffle.
Buckwheat is naturally gluten free, but it has a stronger flavor and behaves differently from a 1-to-1 blend.
This recipe was designed around a complete 1-to-1 blend, not a single alternative flour.
If you have more of the same flour blend to use, try these homemade gluten free egg noodles for another practical gluten-free staple.
Troubleshooting Gluten Free Waffles
The Waffles Are Soggy
The waffle iron may not have been completely preheated, the waffles may have been removed too early, or they may have been stacked while hot.
Cook until the exterior is golden, then place each waffle on a wire rack. If necessary, return softened waffles to the hot iron briefly or warm them in a toaster oven.
The Waffles Are Dense
Dense waffles can result from a flour blend that absorbs too much liquid, expired baking powder, or overmixing.
Check the date on the baking powder and measure the flour carefully. Stir only until the wet and dry ingredients are combined.
The Batter Is Too Thick
Gluten-free flour blends vary in absorbency.
If the batter is difficult to pour after the five-minute rest, add milk one tablespoon at a time. Mix gently after each addition and stop when the batter becomes thick but pourable.
The Batter Is Too Thin
Allow the batter to complete its five-minute rest before changing it. Gluten-free flour often thickens as it hydrates.
If it still looks unusually thin, add one tablespoon of the same flour blend and stir gently. Avoid adding a large amount at once.
The Waffles Stick to the Iron
The plates may need a light coating of oil, the iron may not have been hot enough, or the waffle may not have finished cooking.
Grease the plates as directed by the manufacturer and allow the waffle to cook until it releases without force.
The Waffles Split When the Iron Opens
This usually means the waffle was checked before the exterior had set.
Close the iron again, if possible, and allow the waffle to cook for another minute before opening it slowly.
The Waffles Taste Gritty
Some gluten-free flour blends need time to absorb liquid. Resting the batter for five minutes helps hydrate the flour before cooking.
A coarsely milled blend may still produce more texture than a finely milled 1-to-1 flour.
Gluten Free Waffle Toppings
The nutrition estimate for this recipe covers the waffle only. Syrup, butter, fruit, yogurt, and other toppings should be calculated separately.
Sweet topping ideas include:
Fresh strawberries, blueberries, or raspberries
Sliced banana
Pure maple syrup
Greek yogurt
Nut or seed butter
Chopped pecans or walnuts
Cinnamon
Unsweetened applesauce
Whipped cream
A small amount of powdered sugar
For a savory breakfast, try:
Scrambled or fried eggs
Sliced avocado
Cottage cheese
Smoked salmon
Tomato and fresh herbs
Shredded cheese
Sautéed mushrooms
Cooked spinach
Check packaged toppings individually when gluten avoidance is necessary. Flavored syrups, whipped toppings, nut butters, and seasoning mixtures can differ between brands.
Gluten Free Waffle Variations
Dairy-Free Waffles
Replace the 2% milk with an equal amount of unsweetened plant milk.
Replace the butter with ¼ cup of neutral oil or melted plant-based butter. The waffles may brown differently, and the original nutrition information will no longer apply.
Cinnamon Waffles
Add one teaspoon of ground cinnamon to the dry ingredients.
For a warmer flavor, add a small pinch of nutmeg with the cinnamon.
Blueberry Waffles
Sprinkle a small quantity of blueberries over the batter after pouring it into the waffle iron.
Adding berries directly to the mixing bowl can crush them and release excess liquid. Do not overfill the iron because the berries increase the volume of the batter.
Chocolate Chip Waffles
Add a small amount of gluten-free chocolate chips after pouring the batter into the iron.
Keep the chips away from the edges, where melted chocolate can burn or make the plates difficult to clean.
Savory Waffles
Omit the vanilla and reduce the sugar to one teaspoon.
Add chopped chives, black pepper, or a small amount of shredded cheese. These additions change the nutrition values and may increase the sodium.
Gluten-Free Safety and Cross-Contact
A homemade waffle is only as suitable as its ingredients and preparation environment.
The FDA has established requirements for packaged foods that voluntarily use a gluten-free claim. Its gluten-free labeling guidance explains the federal standard.
Check the labels on:
The gluten-free flour blend
Cornstarch
Baking powder
Vanilla extract
Cooking spray or oil
Plant milk, if used
Syrups and sauces
Chocolate chips or other mix-ins
Every packaged topping
For someone with celiac disease or another medical need to avoid gluten, use clean bowls, measuring tools, whisks, spatulas, and work surfaces.
A waffle iron previously used with wheat-based batter can retain crumbs or residue in grooves and around hinges. Clean it according to the manufacturer’s instructions. If it cannot be cleaned adequately, a dedicated gluten-free waffle iron may be the more appropriate option.
Do not describe the waffles as universally “safe for celiac disease.” Suitability depends on the exact ingredients, equipment, preparation environment, and the person’s medical needs.
How to Store and Reheat Gluten Free Waffles
Refrigerating
Allow the waffles to cool completely on a wire rack.
Transfer them to an airtight container and refrigerate for up to three days. Separate the waffles with parchment paper if necessary to prevent sticking.
Freezing
Arrange the cooled waffles in a single layer on a baking sheet and freeze until firm.
Transfer them to a freezer-safe bag or container, placing parchment paper between the waffles. Remove as much excess air as practical and freeze for up to two months for the best quality.
Reheating in a Toaster
Place a refrigerated or frozen waffle in the toaster and heat until the center is warm and the exterior is crisp.
Use a moderate setting first. Gluten-free waffles can brown quickly during reheating.
Reheating in the Oven
Arrange the waffles in a single layer on a wire rack set over a baking sheet.
Warm them at 350°F for approximately five to eight minutes. Frozen waffles may require a few additional minutes.
Reheating in an Air Fryer
Heat at approximately 350°F for two to four minutes, checking early to prevent excessive browning.
Reheating in a Microwave
A microwave warms waffles quickly but does not restore the crisp exterior.
If necessary, microwave briefly and then finish the waffle in a toaster or toaster oven.
Frequently Asked Questions
What gluten-free flour is best for waffles?
A gluten-free 1-to-1 all-purpose flour blend containing xanthan gum works best for this recipe.
Different brands can absorb different amounts of liquid, so weigh the flour when possible and adjust the batter with a small amount of milk only when necessary.
Do regular waffles contain gluten?
Most regular waffles contain gluten because they are made with wheat flour.
Some packaged waffles and restaurant waffles may also contain gluten through other ingredients or cross-contact, even when wheat flour is not obvious from the product name.
How do you make gluten free waffles crispy?
Preheat the waffle iron completely, include the measured cornstarch and butter, cook until golden, and place each finished waffle on a wire rack.
Do not stack the waffles while they are hot because trapped steam softens the surface.
Why are my gluten free waffles gummy?
Gummy waffles may result from an unsuitable flour blend, too much xanthan gum, excess liquid, or insufficient cooking.
Use a 1-to-1 flour blend as directed, do not add more xanthan gum when the blend already contains it, and cook until the waffle releases easily.
Can I make the batter ahead of time?
It is better to cook the waffles shortly after mixing the batter.
Baking powder begins working once it is mixed with liquid, and a long refrigerated rest may reduce the waffles’ lift. For meal prep, cook and freeze the waffles instead of storing the raw batter.
Can I make these waffles dairy free?
Yes. Replace the milk with unsweetened plant milk and the butter with neutral oil or plant-based butter.
The flavor, browning, and nutrition values will differ from the primary recipe.
Can I make the waffles without eggs?
This specific recipe was developed with two eggs.
A commercial gluten-free egg replacer may work, but the batter and finished texture can be substantially different. A tested egg-free waffle recipe is more reliable than replacing both eggs without adjusting the other ingredients.
Can I use almond flour or coconut flour?
Not in the same quantity.
Almond flour and coconut flour have very different fat and liquid-absorption properties. They require recipes developed specifically for those flours.
Can I freeze gluten free waffles?
Yes. Cool the waffles completely, freeze them in a single layer, and then transfer them to a freezer-safe container.
For the best texture, reheat them in a toaster, toaster oven, conventional oven, or air fryer.
How long do gluten free waffles last?
Refrigerate cooked waffles for up to three days or freeze them for up to two months for the best quality.
Allow them to cool before storage so trapped steam does not make them excessively soft.
Are these waffles vegetarian?
Yes. The primary recipe contains eggs and dairy but does not contain meat or fish.
The suitability of individual ingredients still depends on the dietary standards followed by the person preparing the recipe.
More Gluten-Free Recipes
For another gluten-free recipe that can be prepared ahead, try these gluten free ice cream sandwiches with soft chocolate cookies.
You can also explore the complete gluten-free recipes collection for meals, snacks, desserts, and practical ingredient guidance.
Final Tips
For the best gluten free waffles, use a dependable 1-to-1 flour blend containing xanthan gum and measure it carefully.
Preheat the waffle iron completely, let the batter rest for five minutes, and avoid opening the iron too early. Once each waffle is cooked, transfer it to a wire rack instead of stacking it on a plate.
Serve the waffles immediately for the crispest texture, or cool and freeze them for convenient breakfasts. With one straightforward batter and approximately 25 minutes of total preparation, this gluten free waffle recipe produces crisp edges and a soft center without requiring a complicated homemade flour mixture.
combination of rice flour (for body), tapioca starch (for chew), and potato starch (for crispness) creates the magic. Most store-bought gluten free all-purpose blends, like King Arthur Measure for Measure or Bob’s Red Mill 1-to-1, already include xanthan gum to hold everything together.
Reviewed recipe options
Make this recipe fit me
Choose one of seven popular diet options. NutriMatch will confirm whether the recipe already fits, show a reviewed adaptation when available, or recommend recipes that match your choice.
Please choose a diet first.
Reviewed Dairy-Free adaptation
Dairy-Free Gluten-Free Waffles
Use the reviewed substitutions below to prepare a Dairy-Free version while keeping the original recipe's basic method.
Ingredient swaps
300 ml (1 1/4 cups) 2% milk, preferably at room temperatureUse 300 ml (1 1/4 cups) unsweetened dairy-free milk, preferably at room temperature
57 g (1/4 cup) unsalted butter, melted and slightly cooledUse 57 g (1/4 cup) plant-based baking butter, melted and slightly cooled
Check: Check every packaged substitute, sauce, seasoning, and topping for milk ingredients and the cross-contact information you need.
Use these reviewed changes with the original ingredient quantities and instructions above. The original recipe card stays unchanged.
Recipe details, product formulas, and cross-contact information can change. Confirm current labels and use professional guidance when medically necessary.
Already a reviewed match
This recipe already fits Gluten-Free.
No changes are needed based on its reviewed NutriMatch classification. Check the complete ingredients, product labels, and serving details for your own needs.
Recipe details, product formulas, and cross-contact information can change. Confirm current labels and use professional guidance when medically necessary.
Not available for this recipe
This recipe cannot currently be made High Protein with a reviewed adaptation.
NutriMatch will not guess at substitutions. Try one of these recipes that is already reviewed for your choice.
Recipe details, product formulas, and cross-contact information can change. Confirm current labels and use professional guidance when medically necessary.
Not available for this recipe
This recipe cannot currently be made Keto with a reviewed adaptation.
NutriMatch will not guess at substitutions. Try one of these recipes that is already reviewed for your choice.
Recipe details, product formulas, and cross-contact information can change. Confirm current labels and use professional guidance when medically necessary.
Not available for this recipe
This recipe cannot currently be made Low Carb with a reviewed adaptation.
NutriMatch will not guess at substitutions. Try one of these recipes that is already reviewed for your choice.
Recipe details, product formulas, and cross-contact information can change. Confirm current labels and use professional guidance when medically necessary.
Reviewed Vegan adaptation
Vegan Gluten-Free Waffles
Use the reviewed substitutions below to prepare a Vegan version while keeping the original recipe's basic method.
Ingredient swaps
2 large eggs, preferably at room temperatureUse 2 flax eggs (2 tablespoons ground flaxseed mixed with 5 tablespoons water), rested 10 minutes
300 ml (1 1/4 cups) 2% milk, preferably at room temperatureUse 300 ml (1 1/4 cups) unsweetened plant milk, preferably at room temperature
57 g (1/4 cup) unsalted butter, melted and slightly cooledUse 57 g (1/4 cup) plant-based baking butter, melted and slightly cooled
Instruction changes
Let the batter stand for 10 minutes before cooking so the flax and gluten-free flour can hydrate.
Check: Confirm every packaged substitute, sauce, seasoning, and topping is vegan; product formulas and processing aids can vary.
Use these reviewed changes with the original ingredient quantities and instructions above. The original recipe card stays unchanged.
Recipe details, product formulas, and cross-contact information can change. Confirm current labels and use professional guidance when medically necessary.
Already a reviewed match
This recipe already fits Vegetarian.
No changes are needed based on its reviewed NutriMatch classification. Check the complete ingredients, product labels, and serving details for your own needs.
Recipe details, product formulas, and cross-contact information can change. Confirm current labels and use professional guidance when medically necessary.